Languages that compile to JS


Elm

Elm is the strangest language I have encountered in this list.

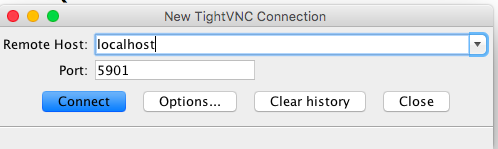
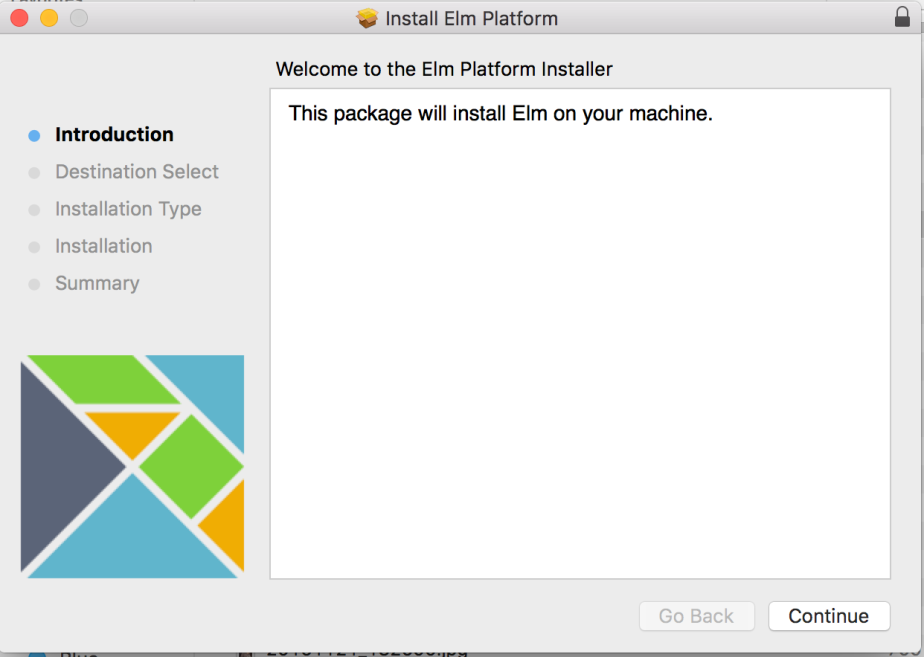
Let’s get started. To install, lets download the package from https://guide.elm-lang.org/install.html and install:

Screen Shot 2016-12-21 at 7.52.18 PM.png

Now, let’s familiarize ourselves with the commands we would need:

// This gives us a command-line interface for Elm
elm-repl
// Compile Elm code to HTML/JS
elm-make Main.elm --output=main.html

Now, let’s do a simple exercise on Elm. We would do an app that has two buttons that can increment/decrement a counter. But first, let’s familiarise ourselves with the “structure” of Elm apps. This structure is reminiscent of backbone:

  • Model – This is where the data is stored.
  • Update – Equivalent to the controller in Rails, this is where we place the logic/functions to implement ways on how to manipulate the data
  • View – This is where we place the HTML and we bind the functions made in the Update part to events in the DOM.

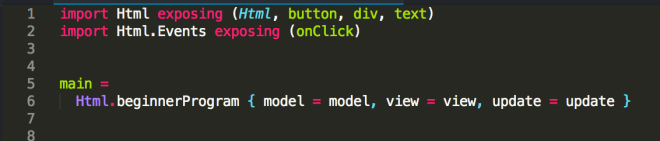
Now, let’s dive into the real example:

First, we import the HTML modules of Elm, exposing elements like button, div and text. We also import HTML events such as onClick.

screen-shot-2016-12-21-at-8-07-32-pm

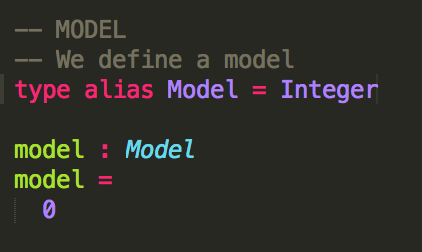
We now define the model. We define the model as an integer initialised with the value of zero.

Screen Shot 2016-12-21 at 8.15.05 PM.png

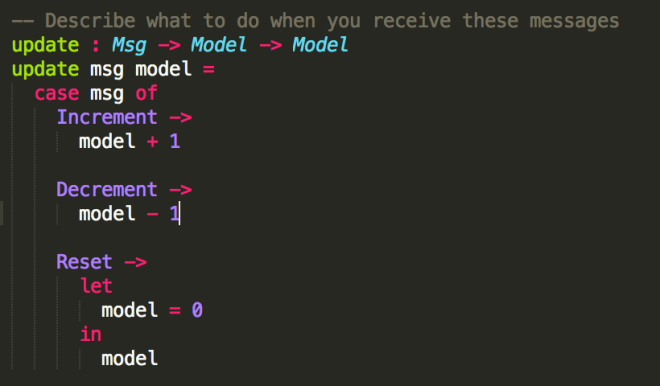
Now, we define three functions that try to update the model.

screen-shot-2016-12-21-at-8-08-31-pm

Here, we define these three functions, and how they change the model.

Screen Shot 2016-12-21 at 8.20.27 PM.png

Here, we define the view.

screen-shot-2016-12-21-at-8-09-39-pm

TypeScript: The Best Parts

// install Node.js first
// then use node to install typescript
npm install -g typescript

// check if we have typescript
tsc -v
// compile typescript to JS
tsc main.ts

Typescipt is made for reverse compatibility with classic JS and JS 2015. In short, Typescript is made to be a superset of these two. This feature makes it attractive for people with systems filled with native JS code. They can migrate their systems to TS module by module.

The best use of Typescript is it’s use of Optional Static Typing. Below, we see that we declare variables to have a certain type, and when we try to place values that aren’t the type supplied in the declaration, it results in an error.

var burger: string = 'hamburger', // String  
burger = false // results to an error
var calories: number = 300, // Numeric 
var tasty: boolean = true; // Boolean

Typescript takes Static Typing to next levels by placing expected data types on parameters of functions.

function speak(food: string, energy: number): void { 
console.log("Our " + food + " has " + energy + " calories."); 
}

Typescript also allows interfaces, or having to define types that we can use to check against functions, or declare variables with.

interface Food { 
name: string; 
calories: number; 
}

Now, we can use this interface to safeguard the types of our objects we plug into our functions, and the kind the function returns

function speak(food: Food): void{ 
console.log("Our " + food.name + " has " + food.calories + " calories.");
 }

Classes are fun in Typescript.

class Menu { 
// Our properties: 
// By default they are public, but can also be private or protected. 
items: Array; // The items in the menu, an array of strings. 
pages: number; // How many pages will the menu be, a number. 

// A straightforward constructor.  
constructor(item_list: Array, total_pages: number) { 
this.items = item_list; // The this keyword is mandatory.
this.pages = total_pages; 
} 

// Methods list(): void { 
console.log("Our menu for today:"); 
for(var i=0; i<this.items.length; i++) {
 console.log(this.items[i]); 
} 
} 
} 

// Create a new instance of the Menu class. 
var sundayMenu = new Menu(["pancakes","waffles","orange juice"], 1); 

// Call the list method. 
sundayMenu.list();

Dart

Dart is Google’s Compile to JS language and despite of that, Google made Typescript the Compile-to-JS language of Angular 2.0. One of the reasons why is the difficult to port nativeJS libraries to dart and the other way around.

Dart has the following data types, each discussed briefly:

  • Num (has type Int and Double)
  • String (has string interpolations)
    • ‘Dart has $s, which is very handy.’
    • ‘${s.toUpperCase()} is very handy!’
  • Bool
  • List
  • Maps
    • var nobleGases = {
       // Keys: Values
       2 : 'helium',
       10: 'neon',
       18: 'argon',
      };
  • Runes (Unicode Characters)
  • Symbols

Variables are reference to objects. If not initialized with a value, the default value is null. We can also add const or final to make constants in Dart.

bool isNoble(int atomicNumber) {
 return _nobleGases[atomicNumber] != null;
}
void enableFlags(
{bool bold = false, bool hidden = false, [String device]}) {
 // ...
}

We can also cascade commands in a very slick way.

querySelector('#button') // Get an object.
 ..text = 'Confirm' // Use its members.
 ..classes.add('important')
 ..onClick.listen((e) => window.alert('Confirmed!'));

CoffeeScript

  • It removes global variables by wrapping all scripts with an anonymous function and putting in var before variables. But you can create global variables if you explicitly do so.
  • Functions
    • sum = (nums...) ->
       result = 0
       nums.forEach (n) -> result += n 
       result
    • Invocation is through sum(1,2,3)
  • Context
    • this.clickHandler = -> alert “clicked”
      // we used the fat arrow so “this” in clickHandler
      // would be the local scope and not of element
      element.addEventListener “click”, (e) => this.clickHandler(e)
  • Hashes
    • object1 = {one: 1, two: 2}

      # Without braces
      object2 = one: 1, two: 2

  •  Conditional Statements
    • # (1 > 0) ? "Ok" : "Y2K!"
       if 1 > 0 then "Ok" else "Y2K!"
  • String Interpolation
    • question = "Bridgekeeper: What... is your favorite color? Galahad: #{favorite_color} Bridgekeeper: Wrong!"
  •  Looping
    • for name, i in ["Roger the pickpocket", "Roderick the robber"]
      • alert "#{i} - Release #{name}"
  •  Lists
    • firstTwo = ["one", "two", "three"][0..1]
  •   Alias
    • @saviour = true // is this.saviour = true
    • User::first = -> @records[0] // User.prototype.first
    •  cool if jamby? //  if (!jamby == null) {cool}


  • Elm
    • Takes a getting used to
    • Has it’s own HTML library so your entire code could be in Elm
  • Typescript
    • Built for gradual migration of native JS/JS2015 to Typescript
    • It’s emphasis for type checking is good
    • Angular 2.0 team is using it
  • Dart
    • difficult to port nativeJS libraries to dart and the other way around.
  • CoffeeScript
    • It’s ruby-like syntax makes JS a joy to code with.
    • It also hides the bad parts of JS to help you make less mistakes


Languages that compile to JS

Project Notes: Ionic-AngularJs

  • On Installing Yo http://stackoverflow.com/questions/37296792/error-while-installing-yeoman
  • “npm upgrade” on upgrading components
  • On adding Cordova https://forum.ionicframework.com/t/unable-to-add-plugins-perhaps-your-version-of-cordova-is-too-old/3807
  • Always do “bower install”
  • Javascript Books Suggested
Project Notes: Ionic-AngularJs

Packet Analysis with Wireshark on TightVNC

On a previous post, I did tcpdump to do a packet analysis. But tcpdump, albeit powerful, could be hard to handle if you aren’t verse with the commands. So in this blog, I would guide you on how to open your Ubuntu Server in a VNC and install wireshark to do packet analysis there. Wireshark is an advance GUI-based packet analysis tool that would help you analyze packets easier.

1. Do these Commands

sudo apt-get update
sudo apt-get install xfce4 xfce4-goodies tightvncserver
// insert password
vncserver

// kill vnc instance
vncserver -kill :1

// create a new file
nano ~/.vnc/xstartup

2. Insert this text into ~/.vnc/xstartup

#!/bin/bash
xrdb $HOME/.Xresources
startxfce4 &

3. Create a VNC service file

 sudo nano /etc/init.d/vncserver

4. Insert the following snippets

#!/bin/bash
PATH="$PATH:/usr/bin/"
export USER="user"
DISPLAY="1"
DEPTH="16"
GEOMETRY="1024x768"
OPTIONS="-depth ${DEPTH} -geometry ${GEOMETRY} :${DISPLAY} -localhost"
. /lib/lsb/init-functions

This is for starting the service

case "$1" in
start)
log_action_begin_msg "Starting vncserver for user '${USER}' on localhost:${DISPLAY}"
su ${USER} -c "/usr/bin/vncserver ${OPTIONS}"
;;

This is for stopping the service

stop)
log_action_begin_msg "Stopping vncserver for user '${USER}' on localhost:${DISPLAY}"
su ${USER} -c "/usr/bin/vncserver -kill :${DISPLAY}"
;;

This is for restarting the service

restart)
$0 stop
$0 start
;;
esac
exit 0

5. Change the permission and start a new VNC instance

sudo chmod +x /etc/init.d/vncserver
sudo service vncserver start

6. Create an SSH connection on your local computer

ssh -L 5901:127.0.0.1:5901 -N -f -l user server_ip_address

7. Install the TightVNC Software from here and download the Java Viewer.

8. Open tightvnc-jviewer.jar and if you have Java installed, you will have this interface. Connect to localhost with port 5901

Screen Shot 2016-05-02 at 11.11.40 PM

9. In the remote desktop, install wireshark

 
sudo apt-get install wireshark 
sudo dpkg-reconfigure wireshark-common
sudo wireshark

Screen Shot 2016-05-02 at 10.53.32 PM


Packet Analysis with Wireshark on TightVNC

Project Notes: Rails API

For my CS145 class, I had to create a Rails API that would be accessible to an Android Application and a JS framework. So I decided to read an entire book on Rails API and document my progress so I can help my future self, and maybe you, to navigate future problems.

    • This is the Rails book. http://apionrails.icalialabs.com/book/chapter_one
    • Chapter 2
      • For problems with shounda-rails “Undefined method respond_with for namespaced controller spec #684″ – the answer by fake-or-dead https://github.com/thoughtbot/shoulda-matchers/issues/684

    • Chapter 3
      • Errors on sabisu-rails “uninitialized constant Sprockets::SassCacheStore” https://github.com/tsechingho/chosen-rails/issues/70
      • Error on sabisu-rails “uninitialized constant Sprockets::SassCacheStore" https://github.com/kurenn/market_place_api/issues/6
    • Chapter 6
      • https://github.com/kurenn/market_place_api/issues/35
      • it “returns the user record corresponding to the given credentials” do @user.reload expect(json_response[:user][:auth_token]).to eql @user.auth_token end #to correct the error cause of the serializing.
      Chapter 7
      
      
      • The author placed has_one and has_many, the other one has to be belongs_to
        
        
        • http://stackoverflow.com/questions/33227299/rspec-failure-error-stack-level-too-dee
      • 


Project Notes: Rails API

Network Monitoring with Nagios & Ganglia

Network Monitoring is a serious field because as much as possible, we would like our servers to be always up. Glitches always happen, and we should prepared for it. Having a NM tool allows you to have power over your network as you can easily identify glitches and fix it, even before the customers complain, or even notice.

Nagios and Ganglia are just two of the services you can use for NM, and both are designed for a specific purpose. Even though there are a lot of NMs out there, they have strived to specialized themselves by choosing a niche for themselves. For Ganglia, it is the use of decentralized polling so that the NM can scale with thousands of servers. For Nagios, it is for a great notification service.

They are actually not mutually exclusive and some network admins actually like to use both at the same time, alongside with other services to harness the power of different services to cater to their company’s specific needs.

So below, you can access a lab report that you can follow and a video tutorial that can help you get started with Nagios and Ganglia and come to better appreciation with those tools.

Nagios

Ganglia

Network Monitoring with Nagios & Ganglia

Web Design with WordPress

    • For you to start designing WordPress sites, you need to have a basic idea of how WordPress works, and how it structures its contents
    • Of course, read up on some principles of web designs. The links below are the quickest and most helpful articles I have gathered on the net. Make sure that you click on every URL that the the blog posts provide, the links gives you practical examples on what is best done, it actually illustrates what the article means:
    • There’s even more content out there, so don’t stop with these sources. Web design in itself is an entire world of possibilities, and be sure not to miss out on it. The links above are just to get you started.
    • Now, let us begin with the usual process. You shall design a website for you to do that, here is the workplan methodology that I am proposing:
      • Define the Brand.
        • What is it that you people to feel, to know, when they enter your site?
      • Define the Purpose
        • What is the objective why you are creating the website?
        • List all the features you want in the website.
        • Of those features, what do you think people most go to?
          • Then you should make those important features more accessible. Place them in one of the main navs so they can be easily accessed.
      • Define the Personality
        • Now that you have the BRAND and WHAT FOR of the website, now is the time to materialize the WHO of the website, time to give it some personality.
        • To help you generate the WHO of the website, you have to look at other websites and see how they managed to create their own identities. These are your pegs. You can have a mood board of websites that you take print screens on, taking note of the features that you like from each.
        • Take time to look at those websites peg, and decide what kind of feel you should be going for.
        • When you first open your website, in a first glance, you would have a first impression of the website, and as early as now, let’s define those little nitty-gritty:
          • Font Scheme
          • Color (Remember, for readability high-contrast text would be best. Meaning, dark text on light bg… this is for readability, which is often divine in web design)
      • Help the Coder Code
        • Well, this one is optional, but it would be best if you can choose an already existing  Wordpress template that the coder could work with. Ideally, the template should be free to save us from the hassles of having to buy a license.. but should you wish to choose one that has a pricetag on it, check with your chairperson if it would be okay.
        • In any case, if you so decide that you want to build a website from the ground-up, at least choose a wordpress template that closely resembles a bare skeleton of the website you want to do.
      • Unto to the Photoshop/Illustrator table
        • Being a coder myself, this is not my forte. But the process I have outlined in this blogpost should at least give you a guide on creating the best website in PSD. Be sure to read the blogpost thoroughly and read the style guides placed here. That would help you enormously when starting to create the website.
        • If there’s one thing I should reiterate, its is for you to think of the User. Make things easier for him, always.
        • Also, do use grids ( a lot of them) when designing the website. Grids make me happy, and also allow you to think more web-oriented.
        • Set your pixels of your canvass to 800×600 and you are ready to go brother.
Web Design with WordPress

Project Notes: WordPress Research

25 Different WordPress Tutorials on the net

http://rockablethemes.com/wordpress-themes-tutorials/

The WordPress Tutorial that really got me started

http://wp.tutsplus.com/tutorials/wordpress-theme-development-training-wheels-day-one/

The best info graphic on wordpress file structure

http://yoast.com/wordpress-theme-anatomy/

The legendary wordpress loop

http://blog.teamtreehouse.com/wordpress-loop-beginners-guide

The essential PHP Tutorial (not required but really helpful)

http://html.net/tutorials/php/lesson1.php

Get down and dirty with the search bar and styling it

http://www.wphub.com/customising-default-search-box/

On drop-down Monthly Archives

http://www.problogdesign.com/quick-tweaks/dropdown-the-monthly-archives/

On Categories

http://codex.wordpress.org/Function_Reference/wp_dropdown_categories

On page numbers

http://www.jenst.se/2008/03/29/wp-page-numbers

On styling excerpts (prerequisite the wordpress loop)

http://shibashake.com/wordpress-theme/wordpress-excerpt-how-to-style-it

The better, more advanced styling exceprt photos

http://codex.wordpress.org/Function_Reference/the_post_thumbnail

http://wordpress.org/support/topic/the_post_thumbnail-image-sizes


On styling the comments bar

http://www.wpbeginner.com/wp-themes/how-to-style-wordpress-comment-form/

http://www.yourinspirationweb.com/en/wordpress-from-a-to-z-personalize-the-comments-                   template-part-2/

On displaying comment count on a post

http://wordpress.org/support/topic/add-comment-count-to-post-title

Project Notes: WordPress Research

Project Notes: Sinatra x Restangular

https://www.mobomo.com/2014/10/how-to-set-up-angular-with-rails-part-2/

  • Setting up test frameworks
  • Creating a Rails API
  • Making the Angular frontend talk to the Rails API

http://stackoverflow.com/questions/14511002/angular-js-with-sinatra

  • Conceptual explanation on how AngularJS and Sinatra integrates

http://mykindofgeek.com/programming/its-an-angular-life

  • Code demo

http://arian-celina.com/implementing-rest-services-in-angularjs-using-restangular/

  • Rest services in full angular

https://github.com/mgonto/restangular

  • RESTangular gem
Project Notes: Sinatra x Restangular

MongoDB: Relationships Basics

Embedding versus Associating 

Remember that unlike usual SQL databases, MongoDB, as a NoSQL database, stores its documents in a hash, inside a BSON file. With this, aside from storing the IDs of the objects you are related to (as in a usual association), you could also embed another entire document inside the current document. This technique with hashes is called embedding. Below, we show you the difference between simply embedding and a classic associatuon

How an embedded object is stored in the db

{
  "_id" : ObjectId("4d3ed089fb60ab534684b7e9"),
  "label" : {
    "_id" : ObjectId("4d3ed089fb60ab534684b7e0"),
    "name" : "Mute",
  }
}

How an association is stored in the db

# The parent band document.
{ "_id" : ObjectId("4d3ed089fb60ab534684b7e9") }

# The child studio document.
{
  "_id" : ObjectId("4d3ed089fb60ab534684b7f1"),
  "band_id" : ObjectId("4d3ed089fb60ab534684b7e9")
}

In terms of space efficiency, associations take less space because it just stores the object id. Meanwhile, we use embedding primarily because we want the convenience of having a flat table where everything we have is on just one big table. Instead of using the noSQL equivalent of joining tables, we already have what we need. This feature is specially prominent in uses where you constantly need of a flat table (i.e data science) as it reduces the time of joining the table, although it takes a significant overhead trying to keep the collections updated with respect with one another.

Embeds One

Embeds one does exactly what it says. It embeds one document inside another.

The owner class (band) uses the embeds_one macro while the owned class (label) uses the embedded_in class.

class Band
  include Mongoid::Document
  embeds_one :label
end

class Label
  include Mongoid::Document
  field :name, type: String
  embedded_in :band
end

In the database, an instance of the band class looks like this:

{
  "_id" : ObjectId("4d3ed089fb60ab534684b7e9"),
  "label" : {
    "_id" : ObjectId("4d3ed089fb60ab534684b7e0"),
    "name" : "Mute",
  }
}

>The label object is actually embedded inside the owner band instance. Notice that we embed the label object with the label key. If we want another key, we simply set the name of our preference using the :store_as option. This comes with caveat of reduced readability.

class Band
  include Mongoid::Document
  embeds_one :label, store_as: "lab"
end 

Embeds Many

Embeds many does exactly what it says. It allows you to embed many documents insider another document.

The owner class (band) uses the embeds_many macro while the owned class (label) uses the embedded_in class.

class Band
  include Mongoid::Document
  embeds_many :albums
end

class Album
  include Mongoid::Document
  field :name, type: String
  embedded_in :band
end

In the database, the bandIn the database, an instance of the band class looks like this


{
  "_id" : ObjectId("4d3ed089fb60ab534684b7e9"),
  "albums" : [
    {
      "_id" : ObjectId("4d3ed089fb60ab534684b7e0"),
      "name" : "Violator",
    }
  ]
}

As you can see, instead of a single document, we have a list instead. That’s the structural difference between an embeds_one and embeds_many. Again, we can do a store_as:


class Band
  include Mongoid::Document
  embeds_many :albums, store_as: "albs"
end


Has One 

As we mentioned in the earlier section, when we say that an object has a has_one association, it means yes it owns an instance, but instead of embedding a copy of the object inside of itself, we just store the id of the owner object inside the owned object.

With the given example models below:

class Band
  include Mongoid::Document
  has_one :studio
end

class Studio
  include Mongoid::Document
  field :name, type: String
  belongs_to :band
end

 We should have the hash:

# The parent band document.
{ "_id" : ObjectId("4d3ed089fb60ab534684b7e9") }

# The child studio document.
{
  "_id" : ObjectId("4d3ed089fb60ab534684b7f1"),
  "band_id" : ObjectId("4d3ed089fb60ab534684b7e9")
}

Has Many

Now, imagine that instead of just owning one, we let the owner object own many instances of another object. We would have the syntax:

class Band
  include Mongoid::Document
  has_many :members
end

class Member
  include Mongoid::Document
  field :name, type: String
  belongs_to :band
end

With the hash below stored in the dB:

# The parent band document.
{ "_id" : ObjectId("4d3ed089fb60ab534684b7e9") }

# A child member document.
{
  "_id" : ObjectId("4d3ed089fb60ab534684b7f1"),
  "band_id" : ObjectId("4d3ed089fb60ab534684b7e9")
}

Which is essentially the same thing as the has_one hash structure. Why? Because we place the band_id in the owned object. And we imply that a child can only have one parent.

Has And Belongs To Many

This is the association that allows both the parent to have many children and the child to have many parents

class Band
  include Mongoid::Document
  has_and_belongs_to_many :tags
end

class Tag
  include Mongoid::Document
  field :name, type: String
  has_and_belongs_to_many :bands
end

The difference in the database structure is that the concept of a parent is gone because Tag can have many Bands and Bands can have many tags. Each of them now has a list as their foreign_key, referring to each other.

# The band document.
{
  "_id" : ObjectId("4d3ed089fb60ab534684b7e9"),
  "tag_ids" : [ ObjectId("4d3ed089fb60ab534684b7f2") ]
}

# The tag document.
{
  "_id" : ObjectId("4d3ed089fb60ab534684b7f2"),
  "band_ids" : [ ObjectId("4d3ed089fb60ab534684b7e9") ]
}
 
MongoDB: Relationships Basics